➡️ Introduction
Identifying risks is only the beginning of risk management.
The real value comes from what follows: monitoring and controlling those risks throughout the project.
Top 5 Project Management Software
Monitoring and controlling risks ensures that:
✔️ risks remain visible
✔️ response plans are executed
✔️ new threats are detected early
✔️ assumptions remain valid
✔️ corrective actions happen before damage occurs
Without continuous monitoring, even a perfectly built risk register becomes useless.
This article teaches you exactly how to track risks, evaluate changes, and control risk exposure—using professional techniques used in enterprise-level project management.
✅ What Does “Monitoring and Controlling Risks” Mean?
Monitoring and controlling risks is the ongoing process of:
- tracking identified risks,
- assessing whether their probability or impact has changed,
- evaluating if mitigation actions are effective,
- identifying new risks,
- managing issues that emerge from risks, and
- reporting updates to stakeholders.
It is an active process, not a passive one.
✅ Objectives of Risk Monitoring
When done effectively, risk monitoring ensures:
✔️ Early detection of emerging threats
✔️ Accurate forecasting of cost and schedule impacts
✔️ Accountability for risk owners
✔️ Effective execution of mitigation actions
✔️ Alignment with stakeholders
✔️ Better decisions based on real-time risk exposure
Risk monitoring protects the project from surprises and keeps stakeholders confident and informed.
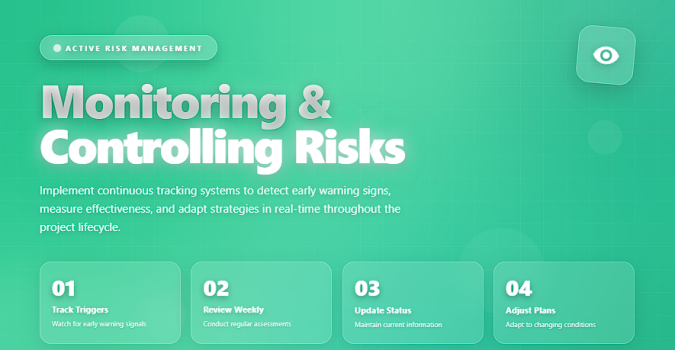
✅ How to Monitor and Control Risks (Step-by-Step)
✔️ 1. Review the Risk Register Regularly
Risk review should occur:
- in weekly status meetings
- during milestone reviews
- after major changes
- when new information emerges
Ask risk owners for updated status, new triggers, and effectiveness of actions taken.
✔️ 2. Monitor Risk Triggers
A trigger is an early warning sign that a risk is beginning to occur.
Examples:
- supplier not responding
- repeated test failures
- delayed approvals
- budget over-spending trends
Monitoring triggers allows the team to intervene before the risk becomes an issue.
✔️ 3. Reassess Probability and Impact
Risks evolve.
A low-probability risk can become high-probability after new information appears.
Update:
- likelihood
- impact
- urgency
- risk score
- risk category (if needed)
Reassessment keeps the risk register accurate.
✔️ 4. Validate Mitigation and Response Effectiveness
Ask these questions:
- Are mitigation actions working?
- Do we need more actions?
- Should the strategy change from Mitigate → Transfer?
- Has the risk become irrelevant and can be closed?
If actions are ineffective, update the response plan immediately.
✔️ 5. Identify New Risks
New risks appear as the project progresses.
Use:
- lessons learned
- stakeholder meetings
- technical reviews
- change requests
- performance reports
Add new risks to the register quickly and assign owners.
✔️ 6. Convert Risks Into Issues When They Occur
A risk becomes an issue when it actually happens.
This requires:
- updating status
- moving the item to the issue log
- executing the contingency plan
- adjusting schedule/cost baseline (if needed)
Risk → Issue → Issue Management
This is standard PM practice.
✔️ 7. Escalate Critical Risks Early
Escalation is needed when:
- impact exceeds team authority
- schedule or cost baselines are threatened
- senior-level decisions are required
Escalate before—not after—the situation becomes serious.
✔️ 8. Integrate Risks into Status Reporting
A professional project status report always includes:
- top risks
- changed risks
- newly added risks
- triggers that occurred
- escalation notes
- completed mitigation actions
This keeps stakeholders informed and reduces misunderstandings.
✔️ 9. Use Dashboards for Real-Time Risk Visibility
Advanced PMs use dashboards for:
- heat maps
- trend charts
- risk aging indicators
- burndown of mitigation actions
Tools like Power BI, Monday.com, Smartsheet, ClickUp, and Excel dashboards make risk monitoring visual and actionable.
✔️ 10. Close Risks When Resolved
A risk should be closed when:
- the threat no longer exists
- the mitigation plan eliminated the cause
- the event window has passed
- the risk occurred and has moved to the issue log
Closing risks keeps the register clean and accurate.
🛠️ Tools Useful for Risk Monitoring and Control
✔️ Excel & Google Sheets — most flexible
✔️ Monday.com — automated reminders, dashboards
✔️ Smartsheet — real-time visibility, governance features
✔️ Miro — visual mapping for cross-functional teams
✔️ Power BI — heat maps & analytics
✔️ Jira — perfect for Agile teams
✔️ ClickUp — risk tracking templates + automation
Use whichever integrates best into your workflow.
❌ Common Mistakes to Avoid
❌ Monitoring risks only once a month
❌ Ignoring medium-severity risks until too late
❌ Not updating triggers or owners
❌ Treating the risk register as a formality
❌ Focusing only on high-impact risks without context
❌ Forgetting to track opportunities, not just threats
⭐ Best Practices
✔️ Review risks weekly
✔️ Use a consistent scoring system
✔️ Assign owners who are truly accountable
✔️ Visualize risks (heat maps, dashboards)
✔️ Communicate early and often
✔️ Keep the risk register alive—not static
✔️ Integrate risk analysis into schedule & cost forecasting
⭐ Final Thoughts
Monitoring and controlling risks is a continuous discipline, not a one-time step.
Projects succeed when teams track risks actively, communicate clearly, and adjust plans as new information emerges.
Great project managers don’t fear risks—
they monitor, control, and stay ahead of them.